Think about this. How about getting a chance to develop amazing smart phone applications using the windows programming languages that you are familiar with, namely C# and VB ? This tutorial will help you start programming your windows phone using Windows 8 and the all new Visual Studio 2012
What will we cover ?
1. Install Windows 8 PRO
2. Configure VMWare workstation to support Hyper V
3. Enable Hyper visor in Windows 8
4. Install Visual Studio 2012 Ultimate Edition
5. Install Windows 8 Phone SDK
6. Install .net 3.5
7. Install Zune
8. Register and unlock the phone
What do we need ?
The tutorial assumes that you have access to the following software before you start. You can get them from MSDN or download separately
- Windows 8 PRO
- Visual studio 2012 Ultimate edition
- Windows 8 Phone SDK
- Zune software
- Vmware workstation
1. Install Windows 8 PRO
Windows 8 can be fetched from the MSDN site. For this install, I made use of VMWare workstation, instead of installing it as a separate partition on my hard drive.
Why pro ?
coz if you don’t have pro, hyper-V would not be enabled, without which you cannot run the phone emulator
2. Configure VMWare workstation to support Hyper V
This involves two steps
1. Modify vmx file
- Go to the virtual machine directory. In my case it was ‘C:UsersAdminDocumentsVirtual MachinesWindows 8 x64’.
- Look for the vmx file. In my case, it was ‘Windows 8 x64.vmx’
- Open the file using notepad, and add the following line in it
hypervisor.cpuid.v0 = “FALSE”
2. Enable Hyper visor in VMware
- Right click on the Virtual machine you created and choose ‘Settings’
- In the ‘Virtual Machine Settings’ windows that opens up, click on ‘Processors’
- Now change the ‘Number of cores per processor’ to 2 ( The emulator simply fails to start, if you set the number of cores as 1)
- And ensure there is check mark next to ‘Virtualize Intel VT -x/EPT or AMD -V/RVI ( See screenshot below for clarifty)
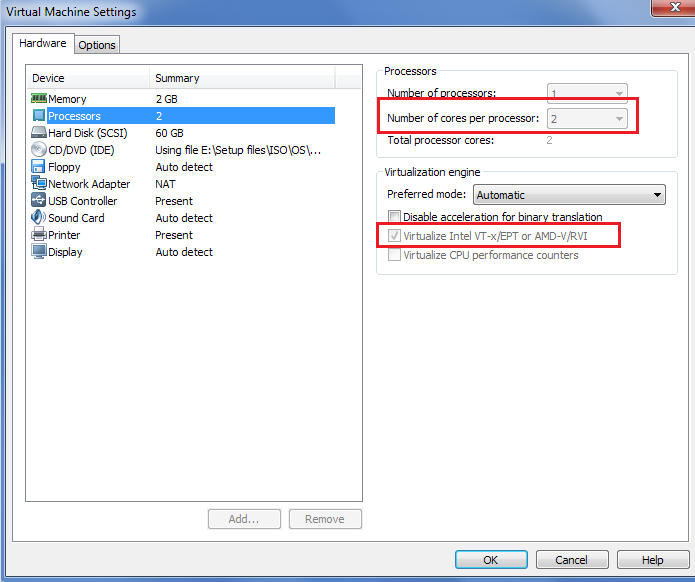
Virtual Machine Settings
3. Enable Hyper visor in Windows 8
1. Go to start menu and type ‘ turn windows feature’. You can see one result under ‘Settings’. Click on it.( See screenshot below )

Turn on windows features in Start menu
2. In the next window titled ‘Windows features’, look for the option ‘Hyper V’ and ensure there is a tick mark next to it. After you put the check mark, windows will restart.
NOTE: If you cannot see the ‘Hyper V’ option, that would probably mean that you do not have a PRO version of Windows 8. But don’t worry, get a product key for the PRO version and you change the product key of the current installation and make it a PRO version ( Google for more details)

Enabling Hyper V in windows 8
4. Install Visual Studio 2012 Ultimate Edition
Download Visual Studio 2012 from the MSDN site and install it.
5. Install Windows 8 Phone SDK
The offline installer can be fetched from this url – http://dev.windowsphone.com/en-us/downloadsdk. You can also google for ‘windows phone 8 SDK offline installer’. It’s approximately 1.6 GB. After downloading, install the SDK to the default location.
Why default location ?
I installed to another directory, and had issues opening up Visual Studio express
6. Install .net 3.5
Why install .net 3.5 and not use existing .net 4.5 that comes with the system ?
The standard windows 8 install does not enable .net 3.5 which is required by several applications including Zune. To enable .net 3.5, do the following.
Open Command Prompt as Administrator and then provide following command:
Dism /online /enable-feature /featurename:NetFx3 /All /Source:F:sourcessxs /LimitAccess
After successfully installing the .net 3.5 you should see a screen similar to this.
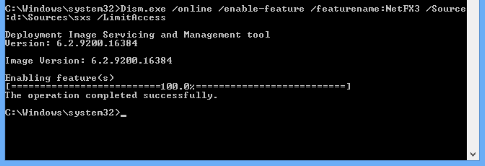
Successful installation on .net 3.5 ( Offline installation)
7. Install Zune
That’s pretty simple. Get the offline installer from here. Install it just like a normal application
8. Register and unlock the phone
- Connect the phone to the PC using USB cable
- Launch the Zune software
- Launch the DEV tools ( Go to Windows 8 start menu and type dev. Look for ‘Windows Phone Developer Registration’. See screenshot below)
- Click on Register ( See the second screenshot below)
Please note that, you need to have a windows phone developer ID with MSDN to register the phone. You can buy this for 99 dolars (approx 5000 Rs ) or if you have MSDN license you can request for 1 year pass for free, after which you might need to pay
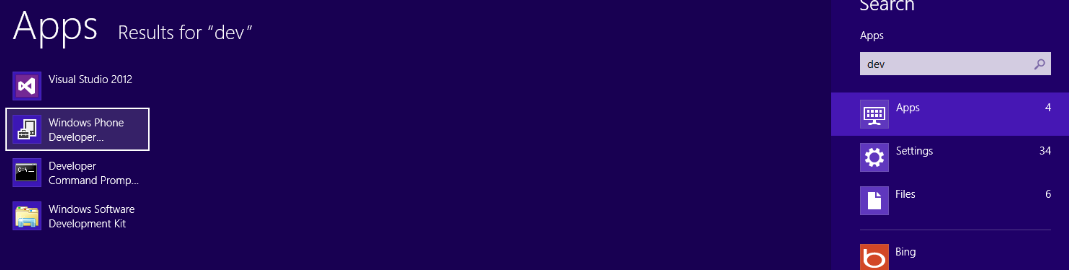
Developer tools in start menu
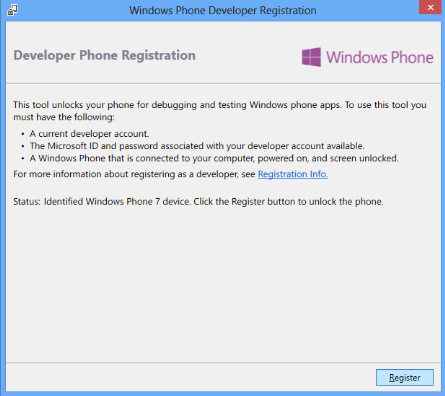
Developer registration screen
Cool. If you have completed all these steps successfully you are on your way to become a successful windows phone developer. In the next post, I will explain the steps necessary to deploy your own application to the windows phone. Until then, happy coding !
excellent submit, very informative. I wonder why the other specialists of this sector do not notice this. You must proceed your writing. I’m sure, you have a great readers’ base already!